이제 곧 크리스마스여서 크리스마스와 맞는 썸네일로 설정했습니다 허허
오늘은 자바스크립트오 힙을 구현해보고자 합니다!
프로그래머스의 힙 문제를 풀다가 자바스크립트는 힙을 직접 구현해야한다는 것을 알게 되었어요.. 그래서 오늘은 직접 구현해보려고 합니다.
📌 힙이란?
힙은 트리 기반 구조의 자료구조입니다. 완벽하게 이진트리로 구현된다고 하네요. 규칙에 따라서 힙은 두가지로 나눠볼 수 있습니다. minHeap과 maxHeap인데요,
Max Heap: 부모 노드는 항상 자식 노드보다 크거나 같아야 한다.
Min Heap: 부모 노드는 항상 자식 노드보다 값이 작아야 한다.
힙 전체를 통틀어서 이 규칙이 곡 유지되어야 합니다.
- 부모 노드는 항상 자식 노드보다 값이 작아야 한다.
- 한 레벨이 모두 채워져야 다음 레벨로 트리가 늘어날 수 있다.
이 두 가지 규칙을 지키는 자료구조를 힙(Min Heap) 이라고 할 수 있습니다.
이 두 가지 규칙을 항상 따르는 힙은 이진트리 자료구조 임에도 불구하고 배열로 구현 할 수 있습니다.
왼쪽 자식 노드 인덱스 = 부모 노드 인덱스 * 2 + 1
오른쪽 자식 노드 인덱스 = 부모 노드 인덱스 * 2 + 2
부모 노드 인덱스 = (자식 노드 인덱스 - 1) / 2

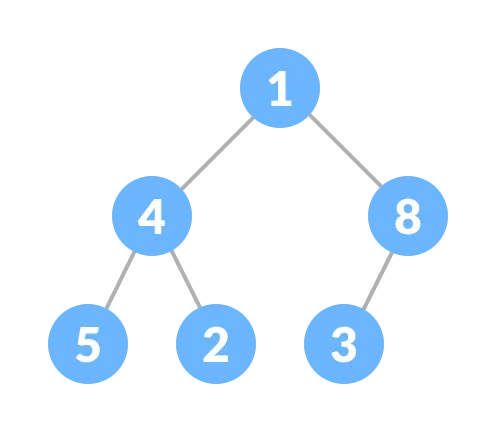
위와 같은 트리를 아래 처럼 배열로 나타낼 수 있습니다.
index: 0 1 2 3 4 5
value: 1 4 8 5 2 3
힙은 왜 필요할까?
힙을 코드로 구현하기 전에 힙이 왜 필요한지를 이해하면 구현하는데 도움이 됩니다. 힙은 주로 최소 | 최대 값을 O(1)의 시간복잡도로 얻어내기 위해서 사용됩니다. 배열이나 연결 리스트 같은 자료구조는 선형 탐색으로 인해서 최소 | 최대 값을 얻기 위해서 O(n) 이 걸린다. 이진탐색을 이용하면 O(logn) 까지도 시간 복잡도를 줄일 수 있습니다.
Min Heap 은 위의 두 가지 규칙 덕분에 항상 최상위 부모 노드에 최소값이 담겨있게 됩니다. 따라서 최상위 노드만 조회하면 바로 최소 값을 얻어낼 수 있기 때문에 O(1) 의 시간 복잡도를 가진다고 할 수 있습니다.
📌 Min-Heap 구현하기
먼저 힙을 구현하기 전에, 힙은 아래와 같은 특징을 가지고 있습니다.
- peek O(1)
- insert O(logn)
- remove O(logn)
힙을 배열로 구현하기때문에, 요소를 삭제하기 위해서는 항상 맨앞에있는 루트 노드 부터 삭제하게 됩니다. 그리고 맨 앞에있는 요소 항상 루트노드입니다. 그리고 삽입을 하는 과정은 두 가지가 있습니다.
JS로 구현하면 아래와 같습니다.
class MinHeap {
  constructor() {
    this.heap = [];
  }

  swap(index1, index2) {
    [this.heap[index1], this.heap[index2]] = [this.heap[index2], this.heap[index1]];
  }

  getLeftChildIndex(parentIndex){ return parentIndex * 2 + 1 }
  getRightChildIndex(parentIndex){ return parentIndex * 2 + 2 }
  getParentIndex(childIndex) { return Math.floor((childIndex - 1) / 2) }

  size() {
    return this.heap.length;
  }

    // 값을 넣되, 오름차 순 정렬함
  push(value) {
    this.heap.push(value);
    let idx = this.heap.length - 1;

    while (idx > 0) {
      const parentIndex = this.getParentIndex(idx);
      if(this.heap[idx] < this.heap[parentIndex]) this.swap(idx, parentIndex);
      else break;
      idx = parentIndex;
    }
  }

    // 값을 빼되, 오름차 순 정렬 함
  pop() {
    const count = this.size();
    if (this.heap.length === 0) return null;
    if (this.heap.length === 1) return this.heap.pop();

    const rootNode = this.heap[0];
    this.heap[0] = this.heap.pop();
    let idx = 0;

    while (this.getLeftChildIndex(idx) < this.heap.length) {
      const rightChildIndex = this.getRightChildIndex(idx);
      const leftChildIndex = this.getLeftChildIndex(idx);
      let minChildIndex = rightChildIndex < this.heap.length && this.heap[rightChildIndex] < this.heap[leftChildIndex] ? rightChildIndex : leftChildIndex;

      if (this.heap[idx] < this.heap[minChildIndex]) break;

      this.swap(idx, minChildIndex);
      idx = minChildIndex;
    }

    return rootNode;
  }

  peek() {
    return this.heap[0];
  }
}
추가적으로 로직을 분리하여 외운 코드는 아래와 같습니다.
class MinHeap {
  constructor() {
    this.heap = [];
  }

  size() {
    return this.heap.length;
  }

  swap(index1, index2) {
    [this.heap[index1], this.heap[index2]] = [this.heap[index2], this.heap[index1]];
  }

  getLeftIdx(parentIdx) {
    return parentIdx * 2  + 1;
  }

  getRightIdx(parentIdx) {
    return parentIdx * 2 + 2;
  }

  getParentIdx(childIdx) {
    return Math.floor((childIdx - 1) / 2);
  }

  add(value) {
    this.heap.push(value);
    this.bubbleUp();
  }

  pop() {
    if(this.heap.length === 0) return null;
    if(this.heap.length === 1) return this.heap.pop();

    const rootNode = this.heap[0];
    this.heap[0] = this.heap.pop();
    this.bubbleDown();

    return rootNode;
  }

  bubbleUp() {
    let idx = this.heap.length - 1;
    let parentIdx = this.getParentIdx(idx);

    while
    (
      this.heap[parentIdx] &&
      this.heap[parentIdx] > this.heap[idx]
    ) {
      this.swap(parentIdx, idx);
      idx = parentIdx;
      parentIdx = this.getParentIdx(idx);
    }
  }

  bubbleDown() {
    let idx = 0;
    let leftIdx = this.getLeftIdx(idx);
    let rightIdx = this.getRightIdx(idx);

    while(
      (this.heap[leftIdx] && this.heap[leftIdx] > this.heap[idx]) ||
      (this.heap[rightIdx] && this.heap[rightIdx] > this.heap[idx])
    ) {
      let smallerIdx;
      if(this.heap[rightIdx] && this.heap[rightIdx] > this.heap[leftIdx]){
        smallerIdx = leftIdx;
      } else smallerIdx = rightIdx;

      this.swap(idx, smallerIdx);
      idx = smallerIdx;
      leftIdx = this.getLeftIdx(idx);
      rightIdx = this.getRightIdx(idx);
    }
  }
}
완벽하게 다 외웠다..! 🥺🥺🥺

